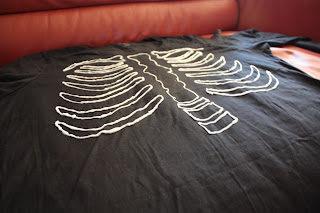
I was drooling over these super cute maternity shirts for Halloween. But by the time I finally found a site that had them (originally found on pintrest) they were sold out of the generic or "boy" versions of the shirt. And the Iron-on one I saw on etsy was $16, plus $7 for shipping to get it in time for Halloween..and I would still have to buy a shirt.
So I decided to make one myself. It can't be that hard...right?
I went and found a cheapo wal-mart shirt, it was about $6, I didn't want to spend a lot of money. I spent $13 total on this project.
I picked up some puffy paint, its glow in the dark...oooh spooky!
Using this photos on this photo
I stood in the mirror and marked the shirt with a piece of chalk where I wanted the ribs to end and where I wanted the baby bum to fit.
I made a template from paper.
Then my hubs cut it out for me, isn't he sweet?
Then I just filled in the template with puffy paint, reversed it for the ribs so they would be close to identical.
Then I just free-handed the middle, you know. the only part that isn't straight..haha
Now just add the baby template
Fill in with paint and add a face
And because hes a sweet baby BOY I added a little blue bow-tie.
It kind of annoyed me that the little girl shirts had bows on the head and the boys didn't get anything, especially when they look so cute in little ties..awwwww.
(I also forgot the baby's ribs when i took these first pics..but I added them later)
I completely forgot to get a "good" pic of me in the shirt but you get the idea.
The shirt glowed REALLY well, all I had to do was turn out of direct light and I was all a glow. The shirt was a big hit, I wore it to work. The best part (other than the price) was really pretty easy, the hubs and I did it all in about an hour, then it takes 4 hours for the paint to dry...and for the price, you'd be silly not to DIY your own shirt.
Well that's what I did for Halloween, did any of you DIY yourself a costume this year?


No comments:
Post a Comment